![[VHS Video Tape]](pic/VHS.gif)
Ever wonder what goes on inside a VTR? And why? Ever wonder what it means to "break the control track" or why you can't seem to fix it if you do? A lot has to do with the way videotapes are recorded. Let's begin with a look at Figure 1, a diagram of how the information is recorded on the familiar brown stuff:
Figure 1: Track layout of a VHS tape
By now, you should have noticed something a little unusual about the track layout of the VHS tape. At the top there you have two audio tracks, set up just like the tracks on an audio tape. The two strange things are that third analog track, the control track marked in yellow, and the strange layout of the video tracks, shown in blue. They are, of course, related.
It takes a lot of information to make up a video image. To complicate matters even more, it is high frequency information. In order to generate a television picture of VHS quality, the video head needs to move across the tape at a rate of about 48 feet per second. At that rate, the standard two-hour videotape would need to be about 345,600 feet...more than 65 miles...long. 48 feet per second works out to nearly 33 mph. I'm estimating here, but such a videotape would require reels about 107 feet in diameter, and would be entirely too heavy to lift. Even worse, when spooling tape off of the outer portion of the reel, the reel would be spinning at about 420 RPM, so it would be dangerous to even get close to that tape. If the tape should break, it would rip through the cassette and the case of the VTR like tissue paper.
The solution to the problem is elegant. Since the tape is a half-inch wide, and since the video image is already packaged into discrete fields (NTSC video is 60 fields per second, two fields per frame), it stands to reason that instead of recording the signal as a continuous signal as is done with audio, the signal can be recorded a field at a time onto chunks of the tape. Inside the VTR, the tape is wrapped around a tilted drum with two heads on it that spins at 3,600 RPM. As the drum spins, the tape is moved past it at a mere 1-7/8 inches per second. A 120-minute videotape is just over 800 feet of tape, which is fairly easy to handle. The head moves over the tape at close to 48 feet per second, even though the tape is moving much more slowly. The result is the pattern of slanted tracks you see in Figure 1.
The difficulty here is that the tape wrap requires a fairly large chunk of tape. Typically in a VTR, the tape first passes over an erase head which removes any signal from the tape, then the audio and control track are re-recorded, and finally the video is recorded. In fact, the audio, video, and control track are all recorded at the same time, but they are recorded on different physical locations on the tape because of the physical spacing of the heads in the machine. This spacing is how you get a broken control track every time you press RECORD. Have a look at Figure 2:
![[What assemble editing looks like]](pic/assemble.gif)
Figure 2: Assemble editing.
The tape in this case is moving from left to right. Notice that at the far left, old audio, video, and control track are recorded on the tape. The tape first encounters the erase head, where the full width of the tape is erased. Notice the brown section between the erase head and the audio/control track head. Notice also that as the video head moves across it creates the diagonal tracks...but because of the distance between the erase head and the video head, there is a large chunk of blank tape in there.
The blank section of tape is what is usually called a control track break. When you edit videotape, the recorder uses the existing control track and video signal to synchronize the recording of the new signal with the existing signal on the tape. The result is a clean edit, but because of the way the recording process works, erasing the tape first, then re-writing the various tracks, there will always be a bit of blank tape at the end of a recording. This is why you cannot repair a control track break; you can only edit more video onto the end of the recording, and literally push the control track break to the end of the show. After performing an assemble edit in the middle of a pre-recorded tape, the tape looks a bit like Figure 3:
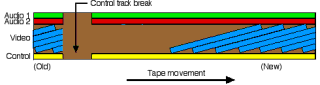
Figure 3: Tape after assemble editing.
Of course, there is a solution for this problem as well, and the solution is insert editing. In insert editing, the tape is selectively erased. By carefully timing the switching of the erase head, the audio tracks can be preserved right up to the edit point. The control track is not erased at all, but rather re-used for the new video. The video track, then, is erased not with the fixed erase head, but rather by a "flying" erase head mounted on the video head drum. This way, the bands of video information are erased and re-recorded one at a time. The result is a clean edit, as shown in Figure 4:
![[What a tape looks like after insert editing]](pic/postins.gif)
Figure 4: Tape after insert editing.
In Figure 4 the darker colors indicate the edited portion of the tape. Notice that while assemble editing (Fig. 3) left a blank section in the middle of the tape, destroyed and replaced the control track, and left incomplete bands of video at the start of the old video material, insert editing left the control track alone, cleanly replaced the video at a field boundary, and cleanly changed the audio at the edit point. Insert editing has an even nicer feature, in that because of the tight control of the recorded track positions, insert editing allows you to edit audio and video independently of one another. So while assemble editing always creates fresh control track, audio, and video, insert editing allows you to preserve existing audio or video. This is especially useful, for example, when conforming video to match an audio track. Or vice-versa.
of course, there is a catch. Insert editing is great, but it does not replace the control track. Instead, it uses the existing control track on the tape to insure that the new video is synchronized with the old video. This allows for the clean break from new video back to old video at the end of the edit. For this reason, you cannot do insert editing on a blank tape, and you cannot insert-edit across a control track break. This is why assemble editing is used at all...it is much faster to assemble edit cuts together than it is to record black on an entire tape and then insert video clips on top of the black. Just remember that if you are doing assemble editing, you cannot move backwards in the project, because the information immediately following an assemble edit is always destroyed.
DCA - 03/29/2000--HTML DCA 03/29/2000